Friday, March 8, 2013

Reusing LEDs

Before I got a hold of the red LEDs I used in the 3x3 LED matrix, I was having a hard time finding a local source for LEDs of any kind. When the holidays rolled around I had a look at some of the Christmas tree lights that were for sale and for a few dollars I bought a string of 100 white lights that look like this:


As you can see from the picture, the head is concave. This type is easy to see from a distance but doesn't look very good on a breadboard. The string of lights this LED came from consists of four seperate strands. The first few LEDs on each strand have resistors soldered to their legs as you can see here. This makes them convenient to plug into a breadboard, even though concave LEDs don't look very good up close.

Later on I found a similar string with frosted convex LEDs. Each of the four strands of 25 LEDs was a different color. I bought several boxes and in the end I paid less than 3 cents per LED! The first few lights on each strand also have resistors soldered to the legs:


One thing I found very interesting about these LEDs is that they grow very brightly. The resistors soldered to the legs are Orange-Black-Red-Gold. This should mean that they are 3000 ohm resistors. In order to get 20mA out of these LEDs I would need around 60 volts. However, when hooked to the 3.6v of my LaunchPad they glow very brightly. By my calculations, if the forward voltage of the LEDs is around 2 volts, the LEDs should be using less than 1mA when the supply voltage is 3.6v. Clearly something isn't as it seems!

Hopefully, I can repurpose some of these LEDs to make a matrix. This should be convenient since they already have wires soldered to their leads. Since each string has four different colors, I don't have enough LEDs to make a large matrix of only one color. My plan now is to combine a red, a green, and a blue LED together to make one RGB pixel. Like other matrixes I saw on the internet, I tried ping pong balls as diffusers. Here is the result using four of the colored LEDs and one of the white ones:


They seem to diffuse very well but ping pong balls here are too expensive to be used for a whole matrix. Once I find a better way of diffusing light, I can move on to soldering the matrix.

Wednesday, March 6, 2013

3x3 LED Matrix

A friend of mine recently asked about making a small LED sign for his business that can scroll text. It seems that buying such signs is pretty expensive. To give him a little demonstration of how it would work I made a small 3x3 matrix of LEDs using a 74HC595 shift register. Using multiplexing it is possible to run a 4x4 matrix with only one shift register but I didn't have that many matching loose LEDs on hand. I was able to draw some simple patterns using an MSP430 and even do some PWM to dim the LEDs.


One thing that surprised me was that the cheap red LEDs I used burned out almost instantly when hooked up to the supply rail without a resistor. Running an LED without any kind of current limiting is of course a bad idea but it was a surprise that these failed so quickly. Others I have experimented with worked without any noticeable damage for a few seconds when hooked up to the few 100mA that the MSP430 LaunchPad can source.

Also, although these LEDs appear to be identical and were bought at the same time from the same store, one of them seems to glow at least twice as bright as the others. Some LEDs I have used seem to glow a little dimmer than others from the same batch but I've never seen one like this that glows so much brighter. I'm not sure what causes this.

Tuesday, March 5, 2013

MSP430 and C115 LCD

Recently I visited a local cell phone repair shop in search of LCDs with pads large enough to solder. What I came out with was a color display from a Motorolla E370 and a two-inch Motorolla C115 monochrome display. There don't seem to be any datasheets or code examples for the E370 on the internet but I was able to get the C115 running with an MSP430.


The first thing I did was solder wires to the ribbon cable. The pads were wide enough to attach normal breadboard wires to. Soldering them individually turned out to be pretty difficult so I first covered all of the pads in solder then placed the wires on the pads and melted the solder by putting the soldering iron on top of the wires.

To run the display I looked at some AVR code I found on a Russian site and tried to adapt it. The LCD uses the I2C protocol so I looked up how to use the UART module in the MSP430G2553 I was using. The AVR code sends the address of the LCD as a 7-bit address shifted left one bit. When I used this address with the MSP430 the LCD didn't respond and I started to suspect that it was broken. Then I decided to use some code I found from TI that checks to see if there are any devices connected at a particular address and used that to scan all the possible I2C addresses. The LCD responded at an address I wasn't expecting. It turns out that the address was wrong because the UART of the MSP430 expects an unshifted address, whereas the AVR code was sending an address that had already been shifted.

After I had the display running, I wrote a few lines of Visual Basic code to convert a bitmap into a C array. Here is a picture I made to test the display:


Then I worked on a font for the display. There are a lot of 5x7 fonts and not much room for creativity at such a small size but I went ahead and made my own character set anyway. My goal was to make the characters slim so that I could fit as many as possible on one line. As you can see in the picture, the font is variable width since any unused spaces aren't drawn. I also made sure that characters like g and j are drawn one pixel lower.


This LCD wasn't too hard to get running and hopefully I can use it in a future project.

Tuesday, January 22, 2013

Binary LED Calculator

After comparing the new solder joints to the ones I was making with the old iron, I decided to start completely over with the LED Binary Calculator. This time I used DIP sockets and new protoboard I was able to buy when I bought the new soldering stuff. This protoboard is 25 holes wide which is really convenient since each of the eight LEDs needs three holes width. There were also just enough of the old red LEDs I was using before to start over with. The solder didn't take to them very well at the beginning so I had to scrape off a lot of the coating that had formed on it. Because I didn't have a battery holder, I soldered on an 8 pin DIP socket to use as a power connector. I taped wires to a CR2032 battery and I stick the ends into the socket for power.


After soldering everything together I ran a test of the LEDs. They only worked correctly once and the only way to get them to work again was to remove both the shift register controlling the LEDs and the MSP430. Toggling the master reset of the shift register didn't help either. Upon closer inspection it turned out the ground connection to the MSP430 had come loose. I was surprised that it ran at all with no ground connection but I have seen it do something similar on a breadboard too. The buttons worked fine from the beginning except that two of them were linked by a solder bridge. After I fixed that, the whole calculator worked as expected.

Sunday, January 20, 2013

More Soldering Practice

There don't seem to be any local shops that sell good soldering iron tips here. Luckily, though,  I was able to buy a few good ones in another city. I was a bit skeptical when the best tips they had only cost a little over a dollar but I brought them home and they work great! I also bought some good 61/39 solder. Using this instead of the cheap 30/70 solder available locally probably helps a lot too. Later I'll see if any of the cheap tips I have work alright with good solder. I don't think I'll risk using cheap solder with the new tip.

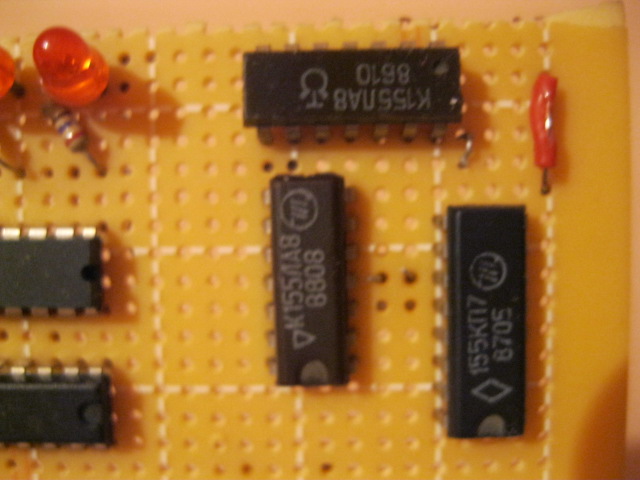
With the protoboard I was using to make the LED Binary Calculator I practiced some more with old soviet chips. Interestingly enough they all have different markings. It was easy to make good solder joints very quickly with my new setup.

Wednesday, December 26, 2012

Learning to Solder and Soviet Logic Chips

After soldering on the LEDs of my RPN binary calculator, I went on to solder the resistors and the 595 shift-register. Unfortunately, this didn't go as well as soldering the LEDs did! I had a lot of trouble getting the solder to flow and the 595 chip ended up getting really hot and may have been damaged. I definitely used too much solder too. Eventually I had to stop soldering because the tip of my soldering iron wore down. I was using steel wool to clean it between joints and this took out chunks of the tip until there wasn't enough left to properly heat the solder any more. It looks like I will need some practice before I continue!


From what I have heard, a good soldering iron tip should have a copper core and be coated with other metals. The cheap tip I was using seems to be made of only one kind of metal. The only other tip I have been able to find is solid copper. We will see how long I can make it last. One good thing about it is that it is wedge-shaped. Many of the soldering iron tutorials I have read recommend a tip like this but most pictures and videos show people using conical tips. My plan is to see how well this tip works and do some practice before I continue working on my calculator.


In order to practice I got my hands on some Soviet era logic chips. They were available locally for a cheap price and I don't need to worry about destroying them if I get them too hot. Before sacrificing them for the greater good, I decided to hook them up on my breadboard. The two I tried were K155LA8s (К155ЛА8 in Russian). According to Chip Directory, LA8 is equivalent to a 7401 chip, which has four NAND gates with two inputs each and open collector outputs. This means that the chip should sink current instead of sourcing it when an output is true. Using an LED to test with, I couldn't get the chip to sink any current but when I hooked it up the other way around, it sourced a small amount. This makes me think that the chip is actually equivalent to a 7400. Also, despite what I read on this website: chipinfo.ru, pin 14 is ground and pin 7 is Vcc, not the other way around. Interesting indeed! The LED I used to test with glowed very dimly, which is to be expected since TTL chips can't source very much current. To remedy this, I hooked the chip up to a transistor labeled "HHE 8051S." (I don't remember exactly what this was salvaged from.) To my surprise, the LED glowed much dimmer when it was driven by the transistor because I had it between the transmitter emitter and ground. Hooked up between the collector and voltage it worked just fine.

Monday, December 3, 2012

Makeshift Soldering Iron

It turns out that temperature adjustable soldering irons are a little difficult to find here. In place of that I tried using a cheap one I found for a little over a dollar. It quickly got too hot and the tip turned black. Solder on the tip beaded up and I couldn't get it to tin correctly. Later I found another soldering iron that was more expensive but I had the same problem. So, I invested in a dimmer switch for lighting and connected my soldering iron to that. After about five minutes smoke came out of the soldering iron and it stopped working. After replacing it I was able to tin it correctly. One thing I noticed is that the iron never gets as hot using the switch as it did without, even when the switch is turned up as high as possible. So far I have done some soldering on my RPN Binary Calculator and it has worked fine. Hopefully this will continue working until I can find a better one. Here is a picture.