Saturday, March 9, 2024

Calculator Keypads

As described in my 2023 goals post, my plan for the year was to finish enough projects to give a presentation at the 2023 Hewlett-Packard Handheld Conference (HHC). Even though I didn't finish everything on my list, there were still enough interesting things to give a presentation on including my Blinky Robot and 6507 Calculator Forth Virtual Machine. The largest part of the presentation was about building calculator keypads.

While building a circuit board or writing the firmware for a calculator are achievable goals for a hobbyist or amateur, building a keypad tends to be much more challenging. The keys themselves can be made on a 3D printer, but getting good quality labels on the keys is very difficult. Since none of my calculator projects so far have had really good keypads, I decided to try every method available for making keys to compare the results.

3D Model
The 3D model for the test consists of eight rows of five keys each designed in OpenSCAD for my still unfinished 6507 Graphing Calculator. OpenSCAD has been my go-to program for modeling since I started with 3D printing a few years ago. The biggest advantage of this program is that the entire model is specified by a script so nothing needs to be manipulated or placed by hand. This works well for people like me who don't have a lot of artistic talent but feel comfortable with programming. It's cheap and relatively quick to print out a set of these keys on my Ender 3.


PVC Cards
As mentioned above, the toughest part is getting labels onto the keys. One thing I experimented with and had some success with was having the labels printed onto CR80 PVC cards. These are the same type of that are used for employee badges and university ID cards. A few years ago, I looked into using these and couldn't find a place that would print them out in quantities less than 250. Last year, I found a local place that will print them for $2 each with no minimum quantity. 


The design above is an SVG image generated by a Python script which is a strategy I have been using more and more recently since it's so convenient. Like with OpenSCAD, it's very powerful to be able to do the layout with code rather than a mouse. It was also easy to change the design around as necessary for further tests once the Python script was set up. Another thing that worked well was generating PNG files directly with the graphics.py Python library instead of SVG which was necessary for some of the later tests. Converting the SVG to PNG for printing turned out to be surprisingly difficult. Some text that was rendered correctly in Chrome would be the wrong size, misaligned or not render as a character when imported into Inkscape, GIMP, or conversion websites like ezgif.com. What worked best was a Chrome extension called SVG Export, although unfortunately it blends the edges of lines when exporting which isn't ideal when the image is laser cut for example. Another problem with using PVC cards is that the labels are not printed out at the exact right physical size even though the PNG file was accurate 
down to the pixel for the CR80 card size. The workers at the printing place explained that the image needed to be at an exact size in inches to come out correct, but doing it that way came out even less accurate. What worked in the end was squeezing all 40 labels onto a single card and having it printed out as a business card by VistaPrint which only charged about $40 for 50 cards. 


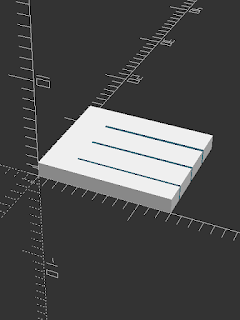
After the cards were printed, the next step was to cut them down to the right size to fit on the keys which was also quite difficult. Cutting the plastic with scissors causes it to rotate leading to curved cuts. My next attempt was using a hammer to try to drive a razor blade through the card which caused the blade to crack immediately. This led me to brainstorming all kinds of solutions that didn't really work. The first one was a holder for two razor blades that keeps them parallel while they are hammered through the card with a rubber mallet. It turns out that there are three common thicknesses for razor blades, so I printed a test piece with slots for all three sizes to figure out the thickness of the ones I had. This project was a neat opportunity to print all types of helper pieces to hold things and measure things which I haven't done much before.


The razor blade holder held up to being hammered with a mallet, but it didn't cut very deep into the card and was very hard to keep aligned over the label while hammering. Next, I tried upgrading to a 3mm thick planer blade with a 3D printed holder, but it didn't work much better. The next iteration was a small guillotine using the planer blade which can at least cut off a clean strip from the end of a thinner CR8010 card that is similar in size to a regular CR8030 card but 10mils thick rather than 30. It didn't work well for normal thickness cards.


Another thing I tried was a 3D printed grid to put the card in with slots that guide the razor blade. Unfortunately, the blade doesn't go very far into the card before the pressure on either side of the cut causes the blade to bind. A smaller guide with only one grid square didn't work either. Next, I tried a custom made steel leather punch. These are sold on Etsy for less than $10 and come in shapes like hearts and stars, so it was no problem to have one made to the size of the key label. The punch will cut all the way through the card but causes the plastic to crack around the hole.


When none of these worked, I invested in a Dremel tool to cut the cards with. There is a cutting wheel made for cutting plastic with the Dremel turned down to low RPMs. Cutting the cards freehand led to very uneven cuts, so I tried clamping down a piece of metal over the card to guide the cutting, but it didn't help much. One idea I had but didn't follow through on was having a piece of metal fabricated with slots to guide the Dremel cutting wheel. Oshcut has a neat service for this that can manufacture a piece of metal from a 2D SVG image. The website shows a 3D preview of the part.


A local makerspace was able to cut the original version of the card on their laser cutter before I knew the card was PVC. As they explained, PVC can damage the laser cutter when cut since it releases harmful gases. The makerspace offered to cut more cards for me despite this which was kind of strange. The cuts are not very clean unfortunately since the gases seem to discolor the card. The picture below also shows how the original design for the card wasn't printed exactly physically correct, so the cuts became more unaligned as the cutting progressed.


One thing that did work somewhat well was cutting the card with a paper cutter. As with scissors, the plastic rotates while being cut which makes the cuts curved, so I 3D printed guides to glue down to the paper cutter. 3D printed inserts that fit into the guides keep the successive cuts aligned and straight. This worked pretty well with the cards from VistaPrint, although the picture below shows that it's not quite perfect. I'm not sure if this is because the card isn't printed to the exact correct size or if it's a problem with the inserts, but it should be fixable by adjusting the size of the inserts. In any case, this is one of the better results I've gotten from all of these tests.


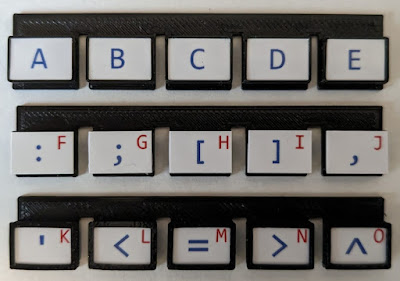
I experimented with a few different designs based off the main design to hold the labels on. They all have holes in the base so that glue can be poured in from the back. The first row has an indentation that holds the labels well without any glue and is the one that came out best. The second row has them glued on. It was interesting that the labels tended to settle on the bases fairly straight without much adjustment. The third row has a cap that fits over the top.


Overhead Transparencies
Another thing I tried was using overhead transparencies which can be printed on a regular printer. This didn't turn out very well on the keypad for my Tiny Calculator project since it used inkjet transparencies, and the superglue holding the labels on caused the ink to blur and run.


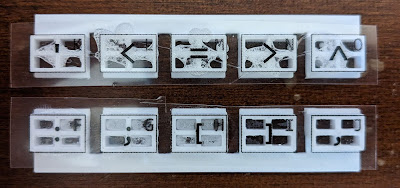
This time, I switched to a transparency that works with laser printers, so the ink won't run when it's glued. The key bases for these are similar to the ones above with holes in the base to pour glue into. Unfortunately, neither superglue nor Gorilla glue dried white, even though the Gorilla glue claimed it would on the bottle, so the results weren't really usable.


Next, I tried gluing the labels to a row with flat faces. Surprisingly, the transparency fell completely off of the keys when the glue was dry and left the toner behind. The lines of the letters are very sharp, and the labels look great. It's not clear yet how durable this would be since the superglue might degrade after a lot of keypresses.


Like the PVC card labels above, I also tried using plastic caps to keep the labels on which didn't work very well. The transparencies can easily be cut with scissors, but it's hard to get the size exactly right. If they're too small, they slide around under the cap which doesn't feel good to type on. Also, the holes in the caps are the same size as the key bases so they have a tight fit, but this put too much pressure on the thin plastic in the caps causing them to crack.


A very interesting Hackaday article shows how to add full-color images to 3D prints by printing the object on top of a toner transparency. The heat of the printed plastic causes the plastic to absorb the ink. The results in the Hackday article look great! When I tried it, the text on the plastic was not very clear, which I think is due to the quality of the laser printer used to print on the transparency. In my case, the result didn't seem especially durable since I was easily able to scrape the toner off with a sharp point. This method might work alright with some extra tweaking.


Dye Sublimation
Dye sublimation works by heating a special ink to a high temperature so that it will sublimate meaning it transitions from a solid directly to a gas. All types of plastic absorb this gas easily leaving a permanent design. Since the ink is absorbed directly into the plastic, it's very durable and will never rub off. Inkjet printers can be converted to print using the sublimation ink, and several sellers on Etsy will print a page of custom designs with the ink for a few dollars. The pages can can be taped down to any piece of plastic with Kapton tape and heated with a sublimation iron causing the design to transfer to the plastic. The first tests I did with this used a small iron made by Cricut which worked well for small pieces but was too small to do an entire keypad. Later, I upgraded to a much larger iron with a 6x7" heating area. The PVC card below shows how sublimating in sections with the small iron leads to an uneven result.


Dye sublimating on PLA caused the key to flatten since PLA has a low melting point. I also tried taping down a sheet of the dye sublimation paper to the 3D printer bed and printing directly onto it after being inspired by printing onto a transparency as described above. The ink did not take very well which must be due to the lower printing temperature of PLA.


Acrylic is a good material to sublimate on, although I had a lot of problems with it warping as it got hot during sublimation. Even clamping a sheet of metal over the acrylic while it was hot with strong clamps was not enough to keep it straight. Also, several pieces of "white" acrylic that I tried came out pretty milky. CMB sells a white acrylic made for sublimating that worked the best by far. After the labels were applied, a local makerspace cut the individual pieces out. The result wasn't perfect due to the warping but came out well overall.


Just as a test, I tried sublimating on an overhead transparency, and the result was great. However, just like with laser printed transparency, there's still no easy way to make exact cuts on the transparency.

Another thing that worked moderately well was 3D printing the keys with PETG filament instead of PLA since PETG has a much higher melting point. This lets it retain it's shape during sublimation for the most part, although a few of the key faces started to melt a bit. PETG is also more difficult to print than PLA, so several of the test keypads had defects in them. This might be a viable way to make keypads with some practice.


Cricut
My wife has a Cricut machine for her crafts, so we tried a few different ways of using it to make labels. The machine has a print head like other printers but holds a pen rather than using an ink cartridge. It also has a small blade on the end for cutting which worked ok for cutting thin CR8010 PVC cards but wouldn't cut through normal thickness PVC cards even after 9 passes. The blade swivels on the end so it can follow the direction the print head moves it in. This makes it a little difficult to get a precise cut on the card. Also, the card is held down to a sticky mat so you have to eyeball where the cutting should start.


Cricut makes dye sublimation pens too, so the machine can create designs on paper that are ready to be sublimated. The Cricut software accepts SVG files but won't draw text embedded in the file, so I constructed test letters out of individual lines using a Python script. The line information is specified by a small interpreted, stack-based language I came up with that is probably over-complicated but would make things easier if the whole alphabet needed to be specified line by line. The Cricut machine does not recognize that the lines in the SVG file can be drawn with a connected stroke, so it lifts the pen and puts it back down for the beginning and end of every line which doesn't look very good. The ink does sublimate onto plastic well though.

"A":"20 >R0 100 Y R0> LU 0 DUR PX> 100 X 100 Y R0> LU 0 DUL >X LL 0 X 50 Y 100 LR",

"B":"25 >R0 15 >R1 100 LD 100 R0> - LR 100 DR PY> 50 R1> + LU PY> - >Y 50 DUL PX> >X >R9 50 R1> - DUR PY> >Y SWAP - LU 0 DUL 0 LL R9> X 50 Y 0 LL",

"C":"20 >R0 R0> Y 0 DUR PX> >X 100 Y 0 DL R0> LU 100 X R0> Y 0 DUL DUP LL 100 Y 100 SWAP - LR 100 DR",


Plastic Casting
The highest quality way to make calculator keys that I tried is casting them from a two-part plastic. There are several companies that sell the two parts as liquids that can be mixed and poured into a silicone mold. Many of them sell a two-part mixture for making the molds too.

The first thing I tried was 3D printing a box to hold the silicone mixture in while it cured. A lot of tutorials show how the object to be molded can be attached to the bottom of the mold box, but in this case, the row of keys is part of the box itself. 


The resulting mold was so detailed that it picked up the lines left by the 3D printing process on the face of the keys so they weren't completely flat. The next time around, I filled the mold box up above the face of the keys and put a perfectly flat piece of plastic into the mold box to cover the keys. This mold only went up to the face of the keys, so I made a second mold using the flat piece of plastic to cover the first. When these two pieces are combined, they form a mold with perfectly flat key faces. A mold like this with an open back where plastic can be poured in is called an open mold. The rows of keys that this mold produced were good quality but the backs were rounded due to the surface tension of the liquid plastic and all the rows were slightly different heights.


The next iteration was a two-part mold with an opening to pour plastic into and sprues to let air and excess plastic escape. The mold is kept an an angle so the air bubbles will rise toward the sprues. These types of plastic parts are often made with a pressure chamber to eliminate bubbles, but it wasn't necessary in this case since there were very few bubbles. The resulting parts were good quality and took dye sublimation well, although some of the rows were a little warped which I think is due to taking them out of the mold too soon.


Pseudo Double-Shot Keys
The best keys on a commercial calculator are the double-shot keys made by Hewlett-Packard. Rather than an ink label, this method uses two different colors of plastic molded together into a single key. I tried to create a similar effect with 3D printing. The first try was raised letters printed in PLA. The  slicer software would not even print the 3.5mm high test text with the standard 0.4mm nozzle on my Ender 3, so I switched it out for a 0.2mm nozzle. This worked a little better but didn't produce a usable result even with the settings tweaked for the smaller nozzle.


For the next test, I added hollows for letters in the keys so that paint or cast plastic can be poured into the back. FDM 3D printers like my Ender 3 can often get better detail printing around fine detail like a letter than printing the letter itself. This came out better than the test above but was not detailed enough to be usable.


The next test was printing the model with an SLA 3D printer which offers much better resolution. The 1mm and 0.5mm slits I left for this were mostly closed up when the keys arrived. It's not clear if this is common for SLA printing or just happened in this case. Unfortunately, I managed to slice through the surrounding plastic while trying to open the slits up which left some parts of the letters unsupported. Pouring acrylic paint into a couple of test keys looked pretty good but had was not very durable. This might work with better SLA printing and cast plastic.


3D Printing Services
The easiest way to fabricate a calculator keypad is to have another company do it. One thing I tried was having someone on Etsy print the keypad on a Bambu X1 3D printer which can print in up to four colors. Even though I paid extra to have a few test runs done to dial in the colors, the seller just printed off the whole keypad and sent it to me. Not surprisingly, the result was not quite perfect with noticeable stringing of the blue filament on the divide and bracket keys for example. At $50 each, this is just too expensive to keep having keypads printed until it's right. It could work really well if I had the chance to tweak the settings.


Another option is a company like ShapeWays that can fabricate parts using different 3D printing technologies than a consumer 3D printer or in other materials such as metal. The biggest obstacle to this was getting the textures onto the model. This should be an easy task, but something broke down between importing the STL file generated by OpenSCAD, applying the textures, exporting the result as an OBJ file and previewing the design on the ShapeWays website. The preview showed either no textures or the same texture from one one key on 10 or more other keys. Part of the problem was uploading files to ShapeWays with spaces in their filename which is an odd limitation not mentioned on the website. Customer support also explained that putting one texture per key was causing problems and that a single texture would work better. The ShapeWays preview is not totally to blame, though, since just saving or exporting the file with textures applied and opening it in another program usually didn't work either whether I tried with a well-regarded program like Blender or half a dozen other modelling programs. Surprisingly, what worked in the end was opening the STL file in Microsoft 3D Builder and applying the textures there.

The first model uses ShapeWays' Multi Jet Fusion (MJF) process which prints the model in full color. The initial price was about $80, but this went down to around $30 after reducing the model to just the caps for the keys rather than the whole key base and adding supports to make the model a single piece. The website explains that the result will have a rough finish that they can smooth, but the keypad was too small to qualify for the smoothing process. The quality of the print if pretty good though the undersides are slightly curved and rough finish makes the colors look a kind of washed out. The second model uses ShapeWays' High Definition Full Color (HDFC) process and looks a lot better though there is a little streaking of the colors on a few keys.


Conclusion
These are all the tests I had time to do before HHC last year. It was really fun presenting about what I've learned even though I haven't found the perfect way to make keypads yet. There are a few more things left to try, so there may be a part two of this article someday.

No comments:

Post a Comment